Logo Masking Techniques for Perfect Transparent Logos (Fast and Easy Photoshop)
One of the most frustrating tasks for designers first learning to use Photoshop, (and even some veterans), is knocking out the background of a flattened logo.
You can’t escape the dreaded “flattened logo”. Whether your client lost the EPS files, or their previous designer never gave them any, there eventually comes a time when you need to save the day. Every designer should have a reliable method for handling this common task.
I would like to share my methods with you now. I’m messed around a lot over the years with Photoshop’s selection tools, and I’ve developed a very quick process for handling clean flattened logos. If someone gives you a clean black-on-white copy of their logo, and you have this process memorized, you will be able to create a transparent background in less than ten seconds. In addition to the easiest case, I’ve also listed a few more scenarios and the solutions you may find useful.
Scenario 1 – The black-on-white.

Open up your logo in Photoshop. If the page has any other junk in it besides the logo, or has oceans of negative space, you should probably crop it down a bit. When you’re read to get started, just press these keyboard shortcuts in this order.
- Ctrl + A (select all)
- Ctrl + C (copy)
- Q (Enter Quick Mask)
- Ctrl + V (paste)
- Q (Exit Quick Mask)
- Ctrl + Shift + I (invert the selection)
- Layer > New Fill Layer > Solid Color
That’s it. Assuming you chose the correct color for your logo when you made the fill layer, you’re done! If things got messed up at some points, it is likely that you were already in quick mask by accident before started, so make sure you aren’t in quick mask, and start over. Also, if the logo provided to you was actually white on black, just invert it before you get started, or skip inverting the selection on step 6.
Scenario 2 – A single color.

Same as Scenario 1, except you need to convert it to black and white first. Just do these two steps before you follow the process above:
- Image > Adjustments > Desaturate
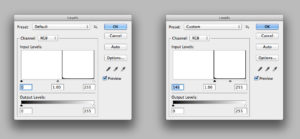
- Image > Adjustments > Levels
If you don’t really understand levels, here’s a bit more explanation.
Simply put, the levels window shows you the distribution of light and dark values in your image. The left side is pure blacks, and the right side is pure whites. In our example above you can see that all of the data in this image is scrunched over to the right side. This is because when you convert colors to greyscale, they become shades of grey rather than pure black. Bright colors like yellow become very light grey, dark colors like navy blue become dark grey, and our red example logo becomes a medium grey.
You need to “clip the blacks”. That means grabbing the little black triangle, and sliding it to the right of the leftmost “spike” on the graph. Everything to the left of that triangle is going to be displayed as pure black.
Scenario 3 – Many colors.

You already learned how to handle single color logos in Scenario 2. The only difference here is that you have to do each color separately.
If you could use some elaboration, I usually use the marquee and lasso tools to make chunky selections. Then I follow steps 1-5 as usual. But, once you exit the quite mask, you’ll have to finish blocking out the rest of the selection. See below for a before and after of cleaning up your selection. The left shows your selection when you exit quick mask, and the right shows how you have to finish it. Again, just use marquees and the lasso here.
It’s also worth mentioning that when you convert a logo with many colors to black, some of those colors might be nearly the same shade of grey. If you are very confident with your masking skills, you should mask very similar values at the same time to be more efficient (in this case “Goog_e”), and then cut the mask apart when you’re done. This is beyond the scope of this tutorial.
Scenario 4 – A greyscale logo with a drop shadow.
In Scenario two, we needed to make the darks darker, but here we also need to make the lights lighter, or “clip the whites”. Open the levels window, and drag the white slider to the left of the rightmost spike until the shadow disappears. Then just clip the blacks in the same way until your logo becomes pure black. You should now have a black logo with no shadow.
If you are not able to achieve a clean result, try opening the channels palette. Look at each of the three channels red, green and blue. If one of these looks like it has enough contrast to work with then select all, copy it, switch back to RGB (make all three channels visible) and then paste. You should be able to use this new greyscale version to follow scenario 4 again. If your results are still not good enough, try the technique in scenario 5.
Scenario 5 – A color logo on grey, or with a drop shadow, and inadequate contrast to produce a clean result.
Sometimes when you convert your image to greyscale, the lightest colors become a shade of grey so close to the drop shadow, that it’s impossible to separate them with the levels tool. But the one thing you have on your side is that the logo has color in it, and the shadow doesn’t (hopefully). Here’s how you handle that.
- Create a new fill layer of a solid red, and place it below your logo in the layer palette.
- Set the blending mode of your logo layer to Saturation. You should now be looking at a red, (reddish?) logo on grey.
- Flatten your file.
- Image > Adjustments > Black and White.
- Drag your red slider all the way to the right and hit okay.
You should now have a greyscale version of your logo with enough contrast to use the methods laid out above. If all else fails, your last hope is to manually draw a vector mask with the pen tool. With practice, you’ll get faster, and eventually be able to produce perfect results quickly. If you can recognize the font used in the logo’s wordmark or the client can tell you what it is, you should always consider getting a copy of the font and setting the type yourself. This can save a lot of time, and you can convert the text to paths and use it as a mask.
Happy masking!
P.S. You can even turn this into a photoshop action to turn the whole thing into a one click process! Props to Braden Schulenberg for the idea.
back to blog
